09/08/2024
Dental Photography: A Cornerstone of Modern Dentistry
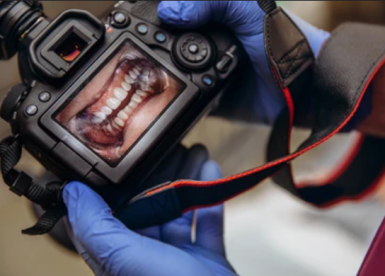
Dental photography has evolved from a mere documentation tool to a vital component of successful dental practice.
High-quality images not only showcase the dentist's expertise but also play a crucial role in patient education and marketing.
Let’s delve into the world of dental photography and guide you through the necessary equipment and fundamental techniques required to excel in dental photography.

Essential Equipment for Dental Photography
While dental photography equipment can be costly, investing in a few key items can yield impressive results.
To get started with dental photography, you need three main pieces of equipment to capture detailed and well-lit images.
Camera Body
Invest in a professional camera to ensure high-quality images. While there are many options available, a DSLR or mirrorless camera is highly recommended.
Macro Lens
A macro lens, preferably a 100mm lens, is crucial for capturing intricate details in dental work. This lens provides the clarity needed to highlight the precision of your treatments.
Flash
Lighting is key in dental photography. You have two main choices for flashes: a ring flash or a twin flash. A ring flash provides even lighting, which is ideal for intraoral photographs, while a twin flash offers better lighting for anterior teeth.
How to Choose
While the market offers a wide range of cameras, lenses, and flashes, it is important to select tools that suit your needs and budget.
For beginners, starting with the basics —a camera body, macro lens, and ring flash— will suffice. As you become more experienced, you can upgrade to a twin flash for improved lighting or enhance the camera body and lens with filters for better image quality.
Fundamental Techniques for Dental Photography
Mastering dental photography involves understanding the three primary camera settings that influence the outcome of your dental photographs.
Aperture
Controls the amount of light entering the camera. A smaller aperture (higher f-number) increases depth of field, making more of the image sharp. For dental photography, an aperture between f/16 and f/22 is generally preferred.
Shutter speed
Determines how long the camera sensor is exposed to light. A faster shutter speed prevents camera shake, resulting in sharper images. A speed of 1/125s is a good starting point.
ISO
Adjusts the camera's sensitivity to light. Lower ISO values produce less noise but require more light. For dental photography, ISO 100 is usually sufficient.
Conclusion
By investing in essential equipment and mastering fundamental techniques, you can produce high-quality images that showcase your skills and attract new patients.
Start with the basics and gradually upgrade your tools and techniques to achieve professional results.
Dental Photography: A Cornerstone of Modern Dentistry
09/08/2024

Dental photography has evolved from a mere documentation tool to a vital component of successful dental practice.
High-quality images not only showcase the dentist's expertise but also play a crucial role in patient education and marketing.
Let’s delve into the world of dental photography and guide you through the necessary equipment and fundamental techniques required to excel in dental photography.

Essential Equipment for Dental Photography
While dental photography equipment can be costly, investing in a few key items can yield impressive results.
To get started with dental photography, you need three main pieces of equipment to capture detailed and well-lit images.
Camera Body
Invest in a professional camera to ensure high-quality images. While there are many options available, a DSLR or mirrorless camera is highly recommended.
Macro Lens
A macro lens, preferably a 100mm lens, is crucial for capturing intricate details in dental work. This lens provides the clarity needed to highlight the precision of your treatments.
Flash
Lighting is key in dental photography. You have two main choices for flashes: a ring flash or a twin flash. A ring flash provides even lighting, which is ideal for intraoral photographs, while a twin flash offers better lighting for anterior teeth.
How to Choose
While the market offers a wide range of cameras, lenses, and flashes, it is important to select tools that suit your needs and budget.
For beginners, starting with the basics —a camera body, macro lens, and ring flash— will suffice. As you become more experienced, you can upgrade to a twin flash for improved lighting or enhance the camera body and lens with filters for better image quality.
Fundamental Techniques for Dental Photography
Mastering dental photography involves understanding the three primary camera settings that influence the outcome of your dental photographs.
Aperture
Controls the amount of light entering the camera. A smaller aperture (higher f-number) increases depth of field, making more of the image sharp. For dental photography, an aperture between f/16 and f/22 is generally preferred.
Shutter speed
Determines how long the camera sensor is exposed to light. A faster shutter speed prevents camera shake, resulting in sharper images. A speed of 1/125s is a good starting point.
ISO
Adjusts the camera's sensitivity to light. Lower ISO values produce less noise but require more light. For dental photography, ISO 100 is usually sufficient.
Conclusion
By investing in essential equipment and mastering fundamental techniques, you can produce high-quality images that showcase your skills and attract new patients.
Start with the basics and gradually upgrade your tools and techniques to achieve professional results.
آخبار أخري
Conquering Chaos: Dentist's Guide to Taming the Day
09/08/2024
The World's Most Tooth-Unfriendly Nations: Top 5 Countries
09/08/2024
When Nature Lends a Hand: Natural Remedies for Dental Pain and Discomfort
09/08/2024